Notice: There is no legacy documentation available for this item, so you are seeing the current documentation.
To truly connect with your audience, your business needs to be present where they spend their time. For a vast number of people today, that place is WhatsApp.
Understanding this shift, the WhatsApp Business platform offers a dedicated suite of tools designed specifically for companies. These features are crafted to help you communicate with your customers more effectively, manage inquiries smoothly, and build stronger relationships.
The first step in using WhatsApp as an engagement channel is to create a WhatsApp Business Account. Here is the simple guide that will help you get started with it.
Creating your Business App with Meta
First, set up a Business app on Meta. This is necessary to use Meta services like WhatsApp for sending messages and setting up automation. We will help you with every step.
1. Create a Business app on developers.facebook.com
Start by heading over to the Facebook Developers website at developers.facebook.com. You’ll want to log in if you’re not already. If you haven’t used the site before, you might need to sign up as a developer first – it’s quick, free, and you can usually do this by clicking “Get started” near the top of the page.
2. Click on My Apps and then Create App.


3. You will be seeing a popup that will ask you about the use cases for which you want to create the app. For example, we are using the name as WA Playground. Now you can click on Next. You can choose any of the use cases that suits your business.

4. You need to now select the app type, we recommend you choose ‘Business‘.

5. You can fill out the required details, if you have the Business Account associated you can choose that otherwise you can leave the field empty. Simply click on Create App

Add WhatsApp product to your Business App
Once you have created the business app, you can use this to access multiple Meta services. For now, we will be adding WhatsApp product to your app.
To add this you can follow the below steps –
1. When you are on app screen, you will see Add Products button, Select WhatsApp and choose to Set up

2. You can choose to create a new Meta Business Account or select from existing. You will now see the onboarding screen, and you have to add the details. Choose your Business Portfolio from the dropdown.

Adding Phone Number & Generating Tokens
You will need to connect to your Business Contact Number if you want to start sending the messages.
1. In the quickstart screen, click Start using the API button.

2. In the API setup section, you need to use the Test number option and click on Add phone number.

3. Now you can create a WhatsApp Business profile and click on the Next button.

4. Next, you’ll provide a phone number for your WhatsApp Business. It’s important to use a number that isn’t currently active on any other WhatsApp account. If you’d prefer to use a number already linked to a WhatsApp account, you’ll first have to move that number over to your business account, which will require you to log in. Once you’ve entered the number, click ‘Next‘ so we can confirm it’s yours by sending you a text message or giving you a call.

5. Now you have to create a temporary access token initially. Click the button labeled ‘Generate access token.’ After you click it, a small modal will pop up on your screen. Just follow the instructions or steps that appear in that modal.

You will need three things copied from this section for adding in PushEngage Settings.
- WhatsApp Business Account ID
- Phone Number ID
- WhatsApp Phone Number
- Access Token

Note : This access token will be valid for 24 hrs only. We will be helping you with creating a permanent access token too.
Generating a Permanent Access Token
What we’ve done so far is a quick way to get WhatsApp up and running on your WordPress site. However, that access token we just created—the one from the previous step—is only temporary and will stop working after 24 hours.
When you’re ready to officially launch and use this integration long-term, you’ll need a permanent access token. To get this, Meta uses a feature called ‘System Users.’ So, the process involves adding a ‘System User’ to your Business Manager account. Once that’s set up, you’ll use the access token belonging to that System User, and that will give you the permanent connection you need.
Add System Users in Business Manager to create a permanent access token.
1. Go to Business Settings.
2. Now you will see below Users, click System Users. Click Add button.

3. Give a name to the system user and choose Admin. Then click Create System User.

4. You can click Assign assets. In the dialog box that appears, select Apps > Your App Name > Full control.
5. You can click Generate token at the top of the screen.
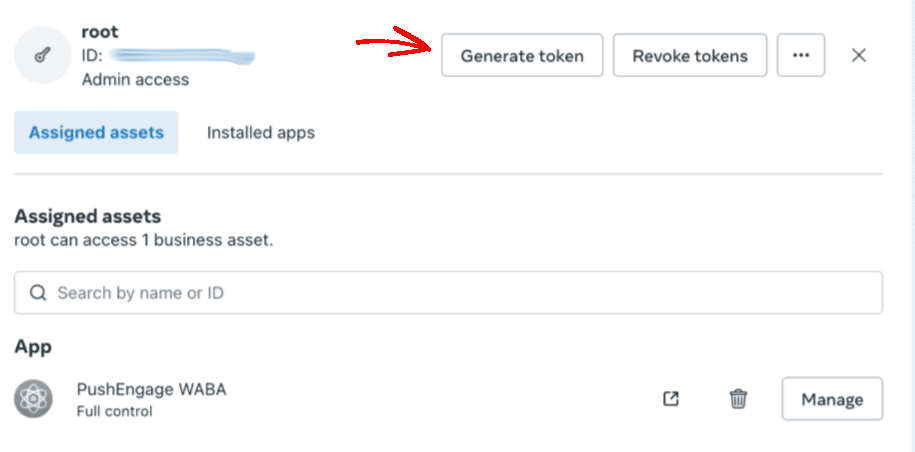
6. In the popup that appears, select an app, expiration period for the token, and permissions. The permissions must be: “whatsapp_business_management” and “whatsapp_business_messaging”.

7. Now click Generate token & copy it.
Connect PushEngage to your Business App
PushEngage would need some information before we can help you send messages to your customers.
You can follow below steps to connect your PushEngage account to your Business App
You can navigate to PushEngage in listed plugins, click on WhatsApp and navigate to Settings Tab

Here, you will be adding details to the WhatsApp Cloud API Settings. Here are the things you would need –

Ensure you have copied and saved following details to add in PushEngage –
- WhatsApp Business Account ID
- Phone Number ID
- WhatsApp Phone Number
- Permanent Access Token

Once you have added all the details, you can click on Save Changes button.
That’s it, you have created WhatsApp Business account and also linked it to PushEngage. You can now start sending campaigns.
If in case you run into any issues, please feel free to contact us by clicking here. Our support team would be able to help you.


